Secure APIs in Spring Boot with JWT
- JWT
- Spring Security
- Spring Boot
I’ve tried several approaches for JWT-based authentication. Some were quick to set up but caused headaches at logout or when the app scaled, while others added so many layers that maintenance became cumbersome. Eventually, I landed on a balanced solution that keeps the development experience straightforward while still offering strong security.
This method relies on short-lived session tokens and long-lived refresh tokens. It makes handling logout far simpler and is flexible enough for a range of scenarios. While the examples here use Spring Boot, the core ideas can work in many frameworks or languages that support JWT.
Scenario
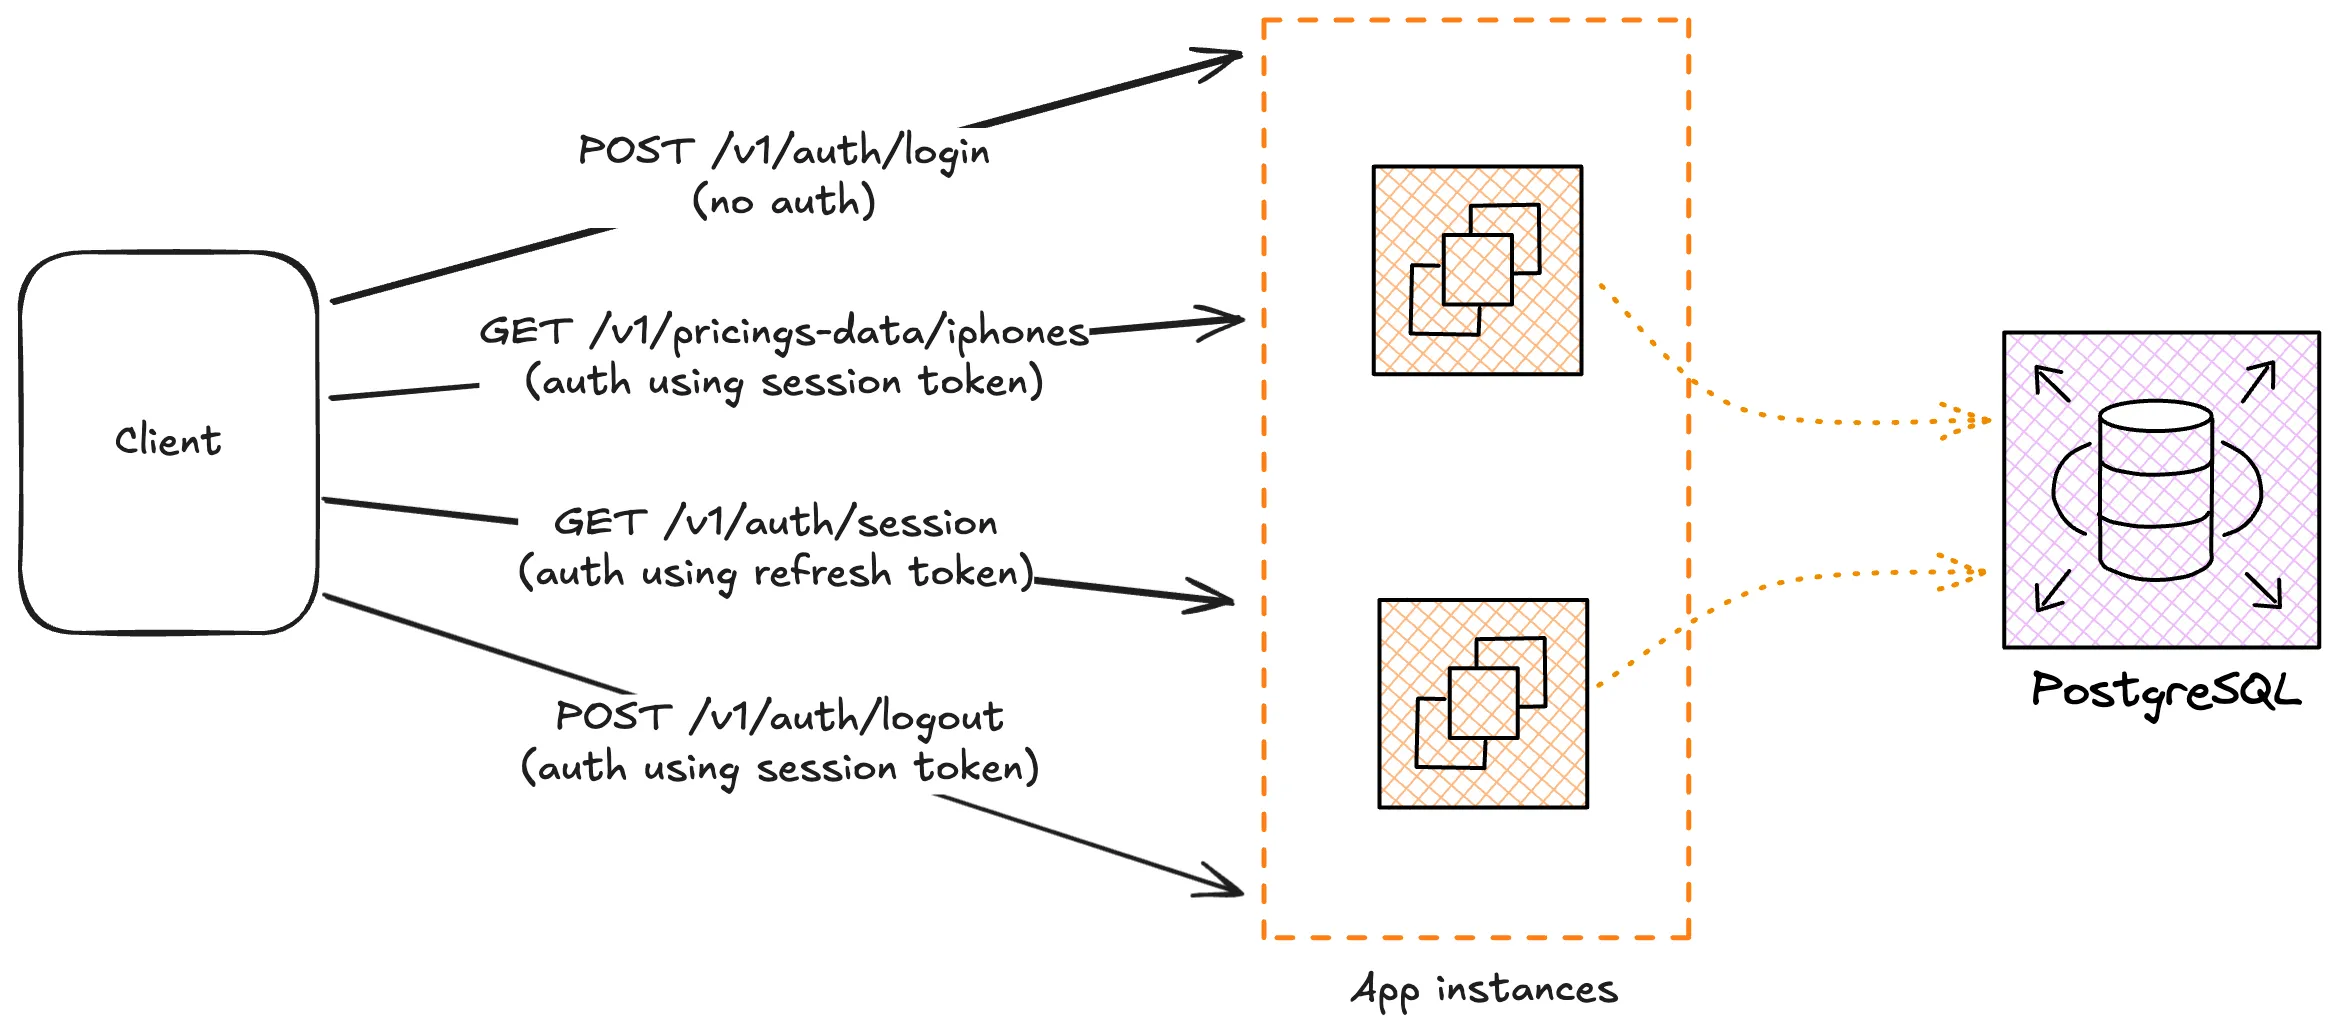
In our contrived example, we run an application that compares product prices across various online stores (Amazon, Best Buy, Walmart, etc.). This service provides REST APIs for customers and backoffice admins, all of which require authentication.
The main requirements:
- Users log in with their username and password. They get a JWT token.
- They include that token when calling the authenticated endpoints.
- They can refresh the token without providing their credentials again.
- Users can be standard customers or admin-level backoffice users, but both need the same basic authentication flow.
Authentication Flow
When I first explored JWT-based auth, I tried a single token approach. Users could opt for a “remember me” mode where the token might last for weeks or months. It looked straightforward: generate one JWT, give it to the user, and accept it until expiry. However, when users log out, the server needs a clean way to invalidate or discard that token. If you rely on the client to remove the token (or a cookie) at logout, it creates potential synchronization issues. One side might think the user is logged out, while the other still sees a valid token.
Eventually I solved that by splitting the tokens into two types:
- Session token
- Short-lived, usually around 15 minutes.
- Meant to be included in the Authorization header for all API requests that need authentication.
- Expires quickly to minimize the damage if someone steals it.
- Refresh Token
- Long-lived, typically valid for a week or more.
- Used only to get a new session token when the short-lived one expires.
- Not valid for accessing the actual protected resources.
Why Two Tokens?
This design tackles the main drawback of a single, long-lived token. When a user logs out, I can store the logout time in the database (or a separate table) and deny any refresh requests made by tokens issued before that logout. This way, even if the old session token is lying around somewhere, it can’t be extended once the user logs out.
It also fixes the logout problem on the client side. The client simply needs to stop sending the token. If an attacker somehow tries to refresh it, the server checks if it’s valid and if it was issued after the user’s last logout. If not, the refresh request fails.
Let me break the auth flow further.
- User login
- The client sends the user’s username and password to an auth endpoint.
- The server validates these credentials.
- The server responds with two JWTs: a short-lived session token and a long-lived refresh token.
- Using the Session Token
- When calling any protected API, the client includes the session token in the
Authorizationheader, e.g.Authorization: Bearer <session token> - The server checks if the token is still valid, not expired.
- If valid, the request goes through. Otherwise, the client can try to refresh the token if they still have a valid refresh token.
- When calling any protected API, the client includes the session token in the
- Using the Refresh Token
- When the session token expires, the client sends the refresh token to a dedicated refresh endpoint.
- The refresh endpoint checks if the refresh token is still valid, not revoked, and was issued after the user’s last logout time.
- If valid, the server issues a fresh session token (and sometimes a new refresh token as well).
- This endpoint only accepts refresh tokens. Passing a session token here will fail.
- User Logout
- When logging out, the client might call a logout endpoint (or I might track it through the UI).
- The server records the logout time in the database.
- Any new attempts to refresh tokens from before that logout will be denied.
Although this seems like a overkill, I have come to find some key benefits in this:
- If someone steals a session token, it’s only valid for a short window (e.g., 15 minutes). They can’t perpetually use it.
- An attacker needs both the session token and the refresh token to maintain continuous access. Even if they manage to grab the session token, it expires soon.
- Tying each token to a specific user, device, or issuance date helps identify suspicious refresh attempts (demonstrating that is beyond the scope of this article).
- If there’s a security concern, I can shorten token lifespans or require more frequent refreshes.
The Signing Key
Most systems I have worked with uses one or the other type of public-private key pair to work with JWT. I tend to say this is the best practice, but I am not a security professional so take this advice with a pinch of salt.
Using an public-private key pair offers several advantages over relying on a single shared secret. One key benefit is that it simplifies distributed verification. In many architectures, there’s a gateway that calls the auth service for token checks, so downstream services don’t need to verify tokens themselves. But in more intricate setups, where microservices also talk directly to one another, each service can keep just the public key and still confirm that tokens are authentic. No private key ever leaves the auth service.
Another advantage is risk reduction. If the system relied on a single shared secret, any leak could compromise the entire authentication process because the same key signs and verifies tokens. With asymmetric cryptography, the public key alone isn’t enough to forge a token. Only the private key can sign a valid token, and it remains confined to the auth service.
Finally, having the private key owned by just one central authority clarifies who can issue tokens. No other system in the network can accidentally (or maliciously) generate valid tokens. This keeps the trust model simple and avoids confusion in distributed environments.
JWT Authentication with Spring Boot
With spring-security, this is quite straightforward.
- First, we configure Spring Security with clearly defined authorization rules. Endpoints are secured based on the expected token type: session tokens, refresh tokens, or no token at all.
- Next, a custom filter examines every incoming request, extracts the JWT from the header, validates it, and assigns the appropriate authority.
- Finally, Spring Security enforces these rules by comparing the assigned authority against the endpoint’s requirements, allowing or denying access accordingly.
But first some basic setups..
Account Model
Let’s quickly define the account model we would be using. It includes the user’s ID, username, password hash, name, and timestamps for creation and logout. Of course this would be much complex in actual systems.
CREATE TABLE user_account (
  id UUID PRIMARY KEY,
  username TEXT NOT NULL UNIQUE,
  password_hash TEXT NOT NULL,
  name TEXT NOT NULL,
  status TEXT NOT NULL,
  created_at TIMESTAMPTZ NOT NULL,
  last_logout_at TIMESTAMPTZ
);
The last_logout_at column tracks when a user last logged out. Whenever a logout happens, this field updates. This is what the system would use to reject any refresh token requests issued before that point. This helps prevent stale tokens from continuing to generate new session tokens.
On the application side, the domain model (and/or entity) mirrors the table structure:
data class UserAccount(
   val id: UUID,
   val username: String,
   val name: String,
   val status: String,
   val createdAt: Instant,
   val lastLogoutAt: Instant?,
)
This simple schema is our foundation for all the authentication logic that follows.
Key-Pair Setup
The first step is to load the JWT configuration from application properties. In a typical Spring Boot setup, you might place these details in your YML file. For example:
jwt:
  public-key: BOLcIzzZSrF/05ULbipDJs6WTiRtBS6R2FiXgKTZPSD/mMy+ImghvOM43p0QzEgh5Q==
  private-key: u0qx+q8DDO4QTjVRz4Q0cThP3osZfg1E
  session-token-ttl: 300
  refresh-token-ttl: 604800
A @ConfigurationProperties class then map these fields into usable properties. It also runs a check to make sure the keys are not blank. This helps catch configuration errors early in the startup process.
@ConfigurationProperties("jwt")
class JwtProperties {
    var publicKey = ""
    var privateKey = ""
    var sessionTokenTtl: Long = 300
    var refreshTokenTtl: Long = 604800

    @PostConstruct
    fun validate() {
        if (publicKey.isBlank() || privateKey.isBlank()) {
            throw IllegalStateException("Invalid JWT token configuration.")
        }
    }
}
The keys here are base64-encoded strings that we need to convert into java.security.PublicKey and java.security.PrivateKey objects.
To handle this, let’s write a SignatureUtils object that provides two helper functions: decodePublicKey and decodePrivateKey. These functions use Java’s KeyFactory and standard key specs (X509EncodedKeySpec for public keys and PKCS8EncodedKeySpec for private keys).
import java.security.KeyFactory
import java.security.PrivateKey
import java.security.PublicKey
import java.security.Security
import java.security.spec.PKCS8EncodedKeySpec
import java.security.spec.X509EncodedKeySpec
import org.bouncycastle.jce.provider.BouncyCastleProvider
import org.bouncycastle.util.encoders.Base64

object SignatureUtils {
    private const val PKI_ALGO = "ECDSA"

    init {
        Security.addProvider(BouncyCastleProvider())
    }

    /**
     * Decode the X509 representation of a public key.
     *
     * @param key the public key in base64
     */
    fun decodePublicKey(key: String): PublicKey {
        val bytes = Base64.decode(key)
        val keySpec = X509EncodedKeySpec(bytes)
        return KeyFactory.getInstance(PKI_ALGO).generatePublic(keySpec)
    }

    /**
     * Decode the PKCS8 representation of a private key.
     *
     * @param key the private key in base64
     */
    fun decodePrivateKey(key: String): PrivateKey {
        val bytes = Base64.decode(key)
        val keySpec = PKCS8EncodedKeySpec(bytes)
        return KeyFactory.getInstance(PKI_ALGO).generatePrivate(keySpec)
    }
}
I am also registering BouncyCastle as a security provider. One reason to include BouncyCastle is that it supports a wide array of cryptographic algorithms and variations. It’s a popular choice when dealing with ECDSA because it can handle different elliptic curves and often provides more consistent support than the built-in providers, especially in certain Java environments.
The JWT models
As discussed above, we have two types of jwt tokens. I also like to embed a few critical pieces of data (claims) inside each JWT:
- Token Type: Identifies whether it’s a “session” token or a “refresh” token.
- User Account ID: A unique identifier that matches the
idcolumn of ouruser_accounttable. - Account Status: Such as
Verified,Blockedetc. If a user is blocked, their token checks fail. - Issue Timestamp: Lets the system see (and audit) when the token was created.
- Feature Access List: Optional, but useful. If a customer subscribes to premium features, I can store that info in the token to grant or deny access quickly.
enum class JwtTokenType {
    SESSION,
    REFRESH,
}

class JwtToken(
    val tokenType: JwtTokenType,
    val userId: UUID,
    val status: String,
    val issuedAt: Date,
    val featuresEnabled: List<Map<String, Any>>?
)
Generating the JWT Tokens
I prefer defining token creation in a dedicated Spring @Service instead of lumping everything into a utility class. It’s a cleaner, more testable, and more maintainable pattern. I’ve seen real-world projects where everything ends up in a JwtUtil, but I strongly discourage that approach.
@Service
@EnableConfigurationProperties(JwtProperties::class)
class JwtTokenService(
    private val properties: JwtProperties,
) {

    companion object {
        const val TYPE = "type"
        const val STATUS = "status"
        const val FEATURES_ENABLED = "featuresEnabled"
        const val INVALID_TOKEN = "Invalid token"
    }

    private val logger = KotlinLogging.logger {}

    private val publicKey = SignatureUtils.decodePublicKey(properties.publicKey)
    private val privateKey = SignatureUtils.decodePrivateKey(properties.privateKey)

    // token generation and parsing ..
}
I use the jjwt library, but any library supporting JOSE should work without any issue.
Generating tokens are simple:
/**
 * Generate a JWT token based on the relevant information.
 */
fun generateToken(
    tokenType: JwtTokenType,
    id: UUID,
    status: String,
    featuresEnabled: List<Map<String, Any>>? = null,
    expirationDate: Instant? = null,
): Pair<String, Instant> {
    val claims = getClaims(tokenType, status, featuresEnabled)

    val issuedAt = Instant.now()

    val exp =
        expirationDate
            ?: when (tokenType) {
                JwtTokenType.REFRESH -> issuedAt.plusSeconds(properties.refreshTokenTtl)
                JwtTokenType.SESSION -> issuedAt.plusSeconds(properties.sessionTokenTtl)
            }

    val token =
        Jwts.builder()
            .claims().empty().add(claims).and()
            .issuedAt(Date.from(issuedAt))
            .expiration(Date.from(exp))
            .subject(id.toString())
            .signWith(privateKey, Jwts.SIG.ES256)
            .compact()
    return Pair(token, exp)
}

fun getClaims(
    tokenType: JwtTokenType? = null,
    status: String,
    featuresEnabled: List<Map<String, Any>>?,
): HashMap<String, Any> {
    val claims = HashMap<String, Any>()
    tokenType?.let {
        claims[TYPE] = tokenType
    }
    claims[STATUS] = status
    if (featuresEnabled != null) {
        claims[FEATURES_ENABLED] = featuresEnabled
    } else {
        claims[FEATURES_ENABLED] = emptyList<Map<String, Any>>()
    }
    return claims
}
Notice how the token’s issued time and expiration are carefully computed. Each token type (refresh vs. session) uses a different TTL, which helps implement the short-lived session token vs. long-lived refresh token concept. We pass a JwtTokenType to determine the appropriate expiration window. The claims map is filled with data like user status or enabled features, which are included in the token’s payload.
Parsing the token is simple as well.
fun parseToken(token: String): JwtToken {
    try {
        val claims = parseClaims(token)
        val tokenType = JwtTokenType.valueOf(claims.get(TYPE, String::class.java))
        val userId = UUID.fromString(claims.subject)
        val status = claims.get(STATUS, String::class.java)
            ?: throw UnsupportedJwtException("A null 'status' claim is not acceptable")
        val issuedAt = claims.issuedAt
        var featuresEnabled = emptyList<Map<String, Any>>()
        if (claims[FEATURES_ENABLED] != null) {
            featuresEnabled = claims[FEATURES_ENABLED] as ArrayList<Map<String, Any>>
        }

        return JwtToken(tokenType, userId, status, issuedAt, featuresEnabled)
    } catch (e: ExpiredJwtException) {
        throw CredentialsExpiredException(INVALID_TOKEN, e)
    } catch (e: Exception) {
        throw BadCredentialsException(INVALID_TOKEN, e)
    }
}

fun parseClaims(token: String): Claims {
    val claimsJws = Jwts.parser().verifyWith(publicKey).build().parseSignedClaims(token)
    val header = claimsJws.header
    if (Jwts.SIG.ES256.id != header.algorithm) {
        throw UnsupportedJwtException("Only ES256 tokens are supported")
    }
    return claimsJws.payload
}
The parseClaims(token) function verifies the token using the public key. By calling verifyWith(publicKey), we ensure the token was actually signed by our private key. We also check the algorithm in the token header to confirm it’s ES256, preventing someone from forging tokens with a different or weaker algorithm. After these checks, we can safely rely on the Claims to represent a valid, unaltered token payload. Errors in parsing, like expired or malformed tokens, raise exceptions such as ExpiredJwtException or UnsupportedJwtException. These are caught and rethrown as relevant Spring Security exceptions which we might use later in our authentication filter.
Spring Security Integration
Let’s define the endpoints and the respective authorization rules.
In our example, we have two distinct authorities for different actions:
REFRESH_TOKEN_AUTHENTICATED_USER: This authority would be used to refresh a session token. It allows access to the/v1/auth/sessionendpoint.SESSION_TOKEN_AUTHENTICATED_USER: This is the authority used to access all other secured endpoints, such as/v1/auth/logout,/v1/pricing-data/**, and so on.
@Bean
fun filterChain(http: HttpSecurity): SecurityFilterChain {
    http {
        addFilterBefore<UsernamePasswordAuthenticationFilter>(
            JwtAuthenticationFilter(
                jwtTokenService,
                userAccountService,
            )
        )

        authorizeHttpRequests {
            authorize("/v1/auth/login", permitAll)
            authorize("/v1/auth/session", hasAuthority("REFRESH_TOKEN_AUTHENTICATED_USER"))
            authorize("/v1/auth/logout", hasAuthority("SESSION_TOKEN_AUTHENTICATED_USER"))
            authorize("/v1/pricing-data/**", hasAuthority("SESSION_TOKEN_AUTHENTICATED_USER"))
            authorize(anyRequest, denyAll)
        }
    }

    return http.build()
}
The login endpoint /v1/auth/login is open to everyone, no authentication required.
The call to addFilterBefore<UsernamePasswordAuthenticationFilter>(JwtAuthenticationFilter(...)) registers our JwtAuthenticationFilter before the standard UsernamePasswordAuthenticationFilter. This custom filter will parse incoming requests, check if a JWT token is present, and verify it. We would implement this shortly.
When a request is successfully authenticated, Spring Security needs an Authentication object to represent the contexts such as the authenticated user, the credentials used for the authentication etc. Instead of the default classes, we define our own:
class ClientAuthentication(
    private val userId: UUID,
    private val authorities: Collection<GrantedAuthority>,
    private val userAccount: UserAccount,
    private val credentials: String,
) : Authentication {
    override fun getAuthorities() = authorities

    override fun setAuthenticated(isAuthenticated: Boolean) {
        throw IllegalArgumentException()
    }

    override fun getName() = userId.toString()

    override fun getCredentials() = credentials

    override fun getPrincipal() = userAccount

    override fun isAuthenticated() = true

    override fun getDetails() = null
}
Here’s how the pieces fit together:
- The
userIdanduserAccountfields give us a quick way to reference the database entity. We keep enough info to handle business logic downstream, like verifying user roles or features. - The
authoritiescollection determines what this user can access. The filter typically constructs this list based on the type of the JWT (e.g., whether it’s a refresh or session token) and sets eitherREFRESH_TOKEN_AUTHENTICATED_USERorSESSION_TOKEN_AUTHENTICATED_USER.
Once the JwtAuthenticationFilter confirms the token is valid, it creates a ClientAuthentication with the correct authorities and places it into the SecurityContextHolder. Spring Security will then apply the configured authorization rules, checking if the authenticated principal has the authority needed to access each requested endpoint.
Now, let’s write the JwtAuthenticationFilter. It takes the raw token, delegates parsing to the JwtTokenService, fetches user details from UserAccountService, and sets everything up for Spring Security to handle authorization checks.
class JwtAuthenticationFilter(
    private val jwtTokenService: JwtTokenService,
    private val userAccountService: UserAccountService,
) : OncePerRequestFilter() {

    companion object {
        private const val SESSION_TOKEN_AUTHENTICATED_USER = "SESSION_TOKEN_AUTHENTICATED_USER"
        private const val REFRESH_TOKEN_AUTHENTICATED_USER = "REFRESH_TOKEN_AUTHENTICATED_USER"
    }

    override fun doFilterInternal(
        request: HttpServletRequest,
        response: HttpServletResponse,
        filterChain: FilterChain,
    ) {
        getAuthentication(request).let {
            SecurityContextHolder.getContext().authentication = it
        }
        try {
            filterChain.doFilter(request, response)
        } finally {
            SecurityContextHolder.clearContext()
        }
    }

    fun getAuthentication(request: HttpServletRequest): Authentication? {
        val authHeader: String? = request.getHeader(HttpHeaders.AUTHORIZATION)
        return when {
            authHeader == null -> null
            authHeader.startsWith("Bearer ") -> getClientAuth(authHeader.substring(7))
            else -> null
        }
    }

    private fun getClientAuth(credentials: String): Authentication? {
        return try {
            val jwtToken = jwtTokenService.parseToken(credentials)
            val userAccount = userAccountService.getById(jwtToken.userId)
                ?: throw UsernameNotFoundException("Invalid token")

            val authorities =
                when (jwtToken.tokenType) {
                    JwtTokenType.REFRESH -> {
                        if (userAccount.lastLogoutAt != null &&
                            jwtToken.issuedAt.before(Date.from(userAccount.lastLogoutAt))) {
                            throw CredentialsExpiredException("User was logged out")
                        }
                        AuthorityUtils.createAuthorityList(REFRESH_TOKEN_AUTHENTICATED_USER)
                    }
                    JwtTokenType.SESSION ->
                        AuthorityUtils.createAuthorityList(SESSION_TOKEN_AUTHENTICATED_USER)
                }

            ClientAuthentication(
                userId = jwtToken.userId,
                authorities = authorities,
                userAccount = userAccount,
                credentials = credentials,
            )
        } catch (e: Exception) {
            throw e
        }
    }
}
The code is pretty easy to follow. The important points are:
- If the token is a refresh token, there’s an extra check: the
lastLogoutAtfield on the user account must benullor later than the token’s issued time. This prevents the reuse of refresh tokens issued before a logout. If that check fails, aCredentialsExpiredExceptionindicates the token is no longer valid. - Based on whether this is a
REFRESHorSESSIONtoken, the filter assigns the appropriate authority:REFRESH_TOKEN_AUTHENTICATED_USERorSESSION_TOKEN_AUTHENTICATED_USER. Later, Spring Security uses these authorities to decide which endpoints the user can access.
Putting it all together
Once the authentication flow is in place, we can expose a simple AuthController that provides login, token refresh, and logout endpoints.
A few simple DTOs that are used to transfer data with the clients:
data class LoginRequest(
    val username: String,
    val password: String
)

data class AuthTokenDto(
    val sessionToken: String,
    val refreshToken: String
)

data class SessionTokenDto(
    val sessionToken: String
)
Also, assuming that the AuthController uses another service that verifies the password and return the associated UserAccount:
@RestController
class AuthController(
    private val jwtTokenService: JwtTokenService,
    private val authAccountService: AuthAccountService,
) {
    // login, refresh token, logout etc..
}
The /v1/auth/login endpoint accepts a LoginRequest, verifying credentials via authAccountService.verifyPassword(...). If valid, it immediately generates both a refresh token and a session token. These two tokens let the user access resources (session token) and refresh their session without re-entering credentials (refresh token).
@PostMapping("/v1/auth/login")
fun login(
    @Valid @RequestBody loginDto: LoginRequest,
): AuthTokenDto {
    val userAccount = authAccountService.verifyPassword(loginDto.username, loginDto.password)

    val (refreshToken, _) = jwtTokenService.generateToken(
        tokenType = JwtTokenType.REFRESH,
        id = userAccount.id,
        status = userAccount.status
    )
    val (sessionToken, _) = jwtTokenService.generateToken(
        tokenType = JwtTokenType.SESSION,
        id = userAccount.id,
        status = userAccount.status
    )

    return AuthTokenDto(
        sessionToken = sessionToken,
        refreshToken = refreshToken,
    )
}
The /v1/auth/session endpoint is restricted to REFRESH_TOKEN_AUTHENTICATED_USER authority, meaning only valid refresh tokens can access it. Spring Security’s filter determines whether the token is indeed a refresh token before calling this method. Therefore, it is guranteed that when this method is invoked, we have a valid UserAccount available via the ClientAuthentication object, which Spring runtime will auto-inject here.
@GetMapping("/v1/auth/session")
fun refreshSessionToken(
    authentication: Authentication,
): SessionTokenDto {
    val userAccount = (authentication as ClientAuthentication).principal
    val (sessionToken, _) = jwtTokenService.generateToken(
        tokenType = JwtTokenType.SESSION,
        id = userAccount.id,
        status = userAccount.status
    )
    return SessionTokenDto(sessionToken)
}
Similarly, the /v1/auth/logout endpoint is restricted to SESSION_TOKEN_AUTHENTICATED_USER, meaning a valid session token must be present. Therefore, we would have access to the UserAccount when this method is invoked. The authAccountService.updateLogoutTime(...) is used to update the user’s lastLogoutAt time in the database. Any refresh token issued before that timestamp can no longer be used to generate new session tokens.
@PostMapping("/v1/auth/logout")
fun logout(
    authentication: Authentication,
) {
    val userAccount = (authentication as ClientAuthentication).principal
    authAccountService.updateLogoutTime(userAccount.email)
}
Final Thoughts
This approach of separating session and refresh tokens has proven both flexible and secure in many scenarios. It addresses common pain points, like how to handle logout gracefully or ensure short-term session tokens don’t linger if compromised. Of course, every project has its own nuances, some might not need refresh tokens at all, while others may require additional logic or stricter rules.
Still, I have found this design as a clean foundation that’s easy to extend. For instance, it is very trivial to attach extra data to the token (like IP address or the user’s country) and verify it at request time. In more sensitive applications, this can provide an extra layer of protection like ensuring the token is only valid from the same geographic region or IP it was issued to. Features like these can be added without overhauling the core authentication process, hence making this pattern a versatile blueprint for a range of real-world use cases.
Happy building!